1. Try to download the Python 3.7 for Window from "https://www.python.org/downloads/"
2. Create a folder in C:/ namely: Python3
3. Run the downloaded file, tick Add Path
4. Press Alt+R then type Regedit
Changing "HKEY_LOCAL_MACHINE\SYSTEM\CurrentControlSet\Control\FileSystem@LongPathsEnabled to 1."
Thứ Ba, 6 tháng 8, 2019
Chủ Nhật, 14 tháng 4, 2019
Set up OpenCV in Visual Studio 2017
Download Visual Studio 2017: https://visualstudio.microsoft.com/downloads/
Download Cmake: https://cmake.org/download/
References:
https://github.com/opencv/opencv opencv-master
https://github.com/opencv/opencv_contrib contrib libraries
Download OpenCV from github site
then extract into a folder name Opencv-master:

then, using CMake to extract Opencv-master into a folder name
OpenCVGithub:


Then Configure => choose some other value like OpenGL,
OpenMP or un-tick in BUILD_JAVA
ð
Generate
Run OpenCV.sln from C:\Dev\Libraries\OpenCVGithub

From Solution Explorer part => Run ALL_BUILD for Debug
X64 and for RELEASE X64 (long time)
Then Run INSTALL for Debug X64 and for RELEASE X64 (faster)

Going to: View => Property Manager


Type env to find
Environment Variables from System Properties

Choose New – Var name: OPENCV_DIR with C:\Dev\Libraries\OpenCVGithub\install\x64\vc15

in Path: create two new paths: %OPENCV_DIR%\bin ; %OPENCV_DIR%\lib

Now open project and set up environment and library for the
project:

C/C++ - General: $(OPENCV_DIR)\..\..\include (% mean module, \.. turn back 1
directory)
Explain for \..\..
OPENCV_DIR: C:\Dev\Libraries\OpenCVGithub\install\x64\vc15
Include: C:\Dev\Libraries\OpenCVGithub\install\include

Linker – General:

Linker – Input:

opencv_core410.lib
opencv_core410d.lib
opencv_calib3d410.lib
opencv_calib3d410d.lib
opencv_datasets410.lib
opencv_datasets410d.lib
opencv_features2d410.lib
opencv_features2d410d.lib
opencv_highgui410.lib
opencv_highgui410d.lib
opencv_imgcodecs410.lib
opencv_imgcodecs410d.lib
opencv_imgproc410.lib
opencv_imgproc410d.lib
opencv_objdetect410.lib
opencv_objdetect410d.lib
opencv_plot410.lib
opencv_plot410d.lib
opencv_quality410.lib
opencv_quality410d.lib
opencv_rgbd410.lib
opencv_rgbd410d.lib
opencv_shape410.lib
opencv_shape410d.lib
opencv_stereo410.lib
opencv_stereo410d.lib
opencv_stitching410.lib
opencv_stitching410d.lib
opencv_surface_matching410.lib
opencv_surface_matching410d.lib
opencv_text410.lib
opencv_text410d.lib
opencv_tracking410.lib
opencv_tracking410d.lib
opencv_video410.lib
opencv_video410d.lib
opencv_videoio410.lib
opencv_videoio410d.lib
opencv_videostab410.lib
opencv_videostab410d.lib
opencv_xfeatures2d410.lib
opencv_xfeatures2d410d.lib
opencv_ximgproc410.lib
opencv_ximgproc410d.lib
opencv_xobjdetect410.lib
opencv_xobjdetect410d.lib
opencv_xphoto410.lib
opencv_xphoto410d.lib
Thứ Hai, 8 tháng 4, 2019
How to Setting Qt GUI using C++ with Visual studio 2017
(including some example)
“C makes it easy to shoot yourself in the foot; C++ makes it harder, but when you do it blows your whole leg off” (Bjarne Stroustrup)
Firstly i wanna to explain about Qt “What is Qt ?” why I use Qt for create GUI? I know that is the first question that everyone want to know :) Okay let’s go!
#What is Qt?

Qt is much more than just a cross-platform SDK-it’s a technology strategy that lets you quickly and cost-effectively design, develop, deploy, and maintain software while delivering a seamless user experience across all devices. Easily create connected devices, UIs and applications with native C++ performance, Write your source code once, build and watch it run on any operating system and hardware. It’s truly cross-platform, Embrace the complete freedom to design tomorrow’s UIs. Use drag-and-drop tools, declarative QML or imperative C++ — the choice is yours, You can design your UI, write your code and much more in one cross-platform IDE. (https://www.qt.io/)
#Step 1: If you already install Visual Studio than just go to this URL https://www.qt.io/download
Download the open source version of Qt(Latest version is 5.10.1) that is suitable for your operating system. this will be automatically detected.
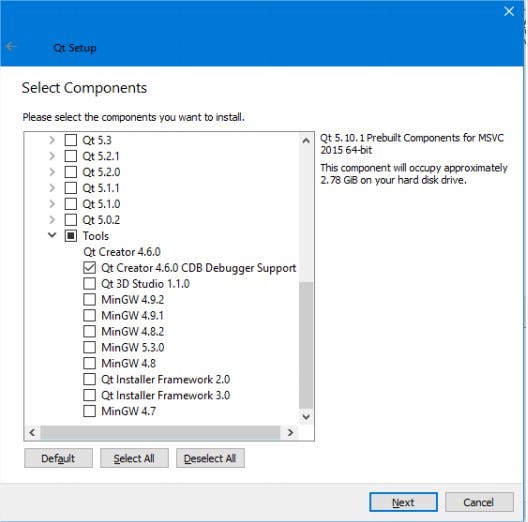
#Step 2: Start the installation. When asked for username, you have the option to skip that step and make sure you install the prebuilt components for the compiler you are using (MSVC2017/ MSVC2015), sources, charts and data visualization component and debugger support like this:
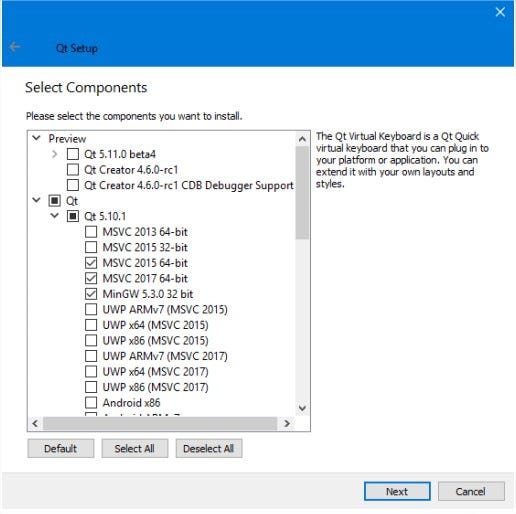
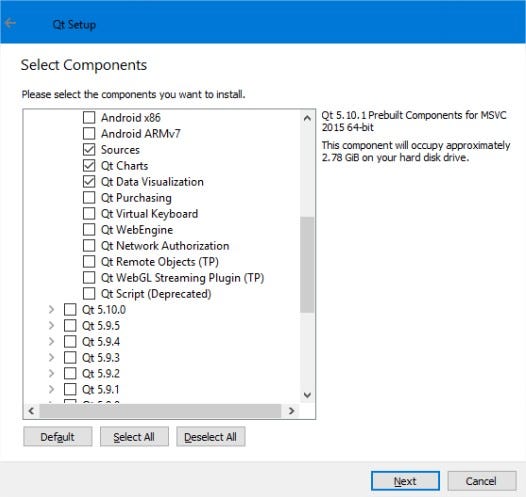
Now you have scroll down and select Tools, Qt Source, Qt chart and also Qt Data Visualization.
#Step 3 : Download and install the Qt Visual Studio Tools from : https://marketplace.visualstudio.com/items?itemName=TheQtCompany.QtVisualStudioTools-19123
#Step 4:
Open Visual studio, if the Qt VS Tools were correctly installed, you should find a new menu item “Qt VS Tools”.

#Step 5:
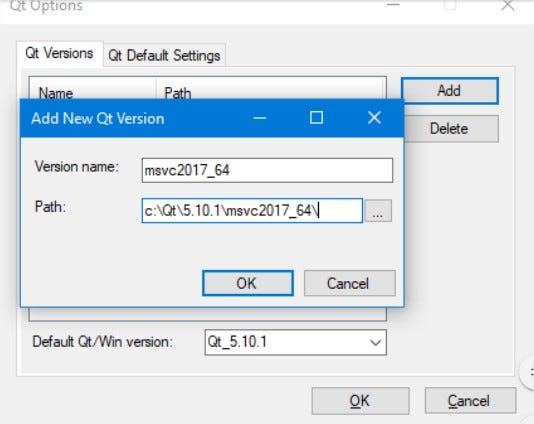
Add the path towards the components for the compiler: Qt VS Tools -> Qt Options-> Add button, Use the folder where you installed Qt
#Step 6:
Done! Restart Visual Studio and than let’s see how to create a new Qt project.
Creating A new Qt Project With VS STUDIO 2017
- From the VS menu, select “File” -> “New” -> “Project”.
- In the left-hand column of the “New Project” window, under “Visual C++” select “Qt”. In the middle column, select “Qt GUI Application”. Add a name and a location and then press “OK”.
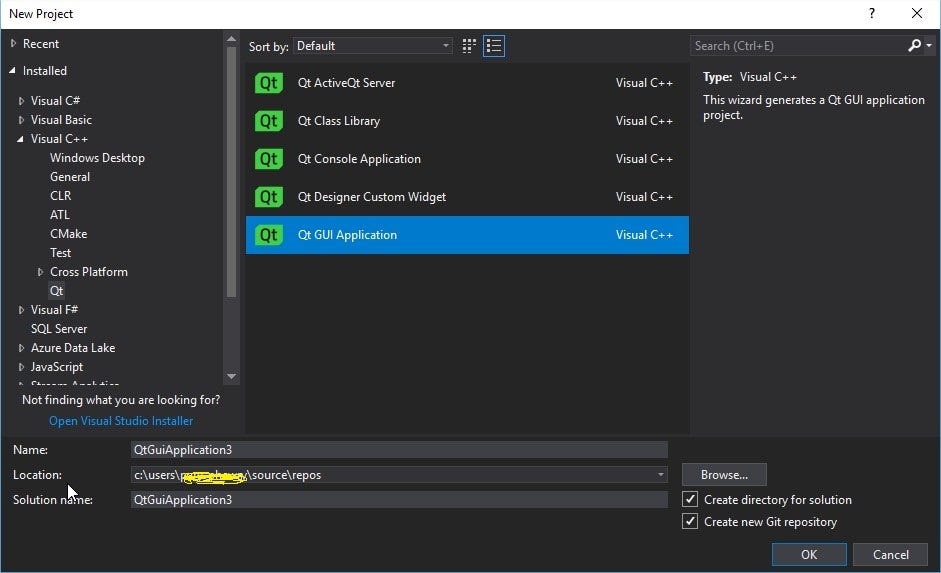
3. In the following dialogs, keep the default settings (Next -> Next -> Finish).
4. In the “Source Files”, a file “main.cpp” should already be created (other .cpp, .h and .ui files will also be created).
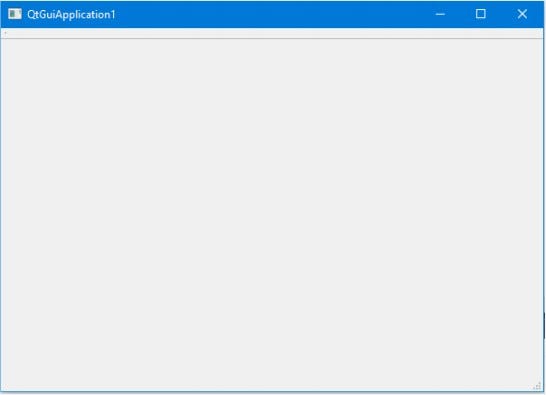
5. Run the application. You should see an empty window:
Now! It’s Done for create a Qt Project. :) See you Next Blog! (How to build GUI Using C++ with Qt Platform)
Reference : https://www.qt.io/
Thứ Hai, 1 tháng 4, 2019
Chủ Nhật, 24 tháng 3, 2019
Error in loading file. DLL
Following the instruction:
- https://www.youtube.com/watch?v=WstkAQwb3so
Download the file. DLL from: https://www.dll-files.com
Then doing some steps belows:
- https://www.youtube.com/watch?v=WstkAQwb3so
Download the file. DLL from: https://www.dll-files.com
Then doing some steps belows:
Step 1
Open the zip-file you downloaded from DLL-files.com .
Extract the DLL-file to a location on your computer.
If you are unsure about how to extract your zip-file we recommend using File Viewer Plus 2. With it you can open your zip-file as well as over 300 other file formats (like video, music, images, pdf etc.) It’s a handy tool to keep around.
After extracting your zip-file, place the extracted DLL-file in the directory of the program that is requesting the file. Make sure to use a 32bit DLL-file for a 32bit program, and a 64bit DLL-file for a 64bit program. Failure to do so will likely result in a 0xc000007b error.
Step 2
If that does not help your problem, place the file to your system directory.
By default, this is
C:\Windows\System (Windows 95/98/Me),
C:\WINNT\System32 (Windows NT/2000), or
C:\Windows\System32 (Windows XP, Vista, 7, 8, 8.1, 10).
On a 64bit version of Windows, the default folder for 32bit DLL-files is C:\Windows\SysWOW64\ , and for 64bit dll-files C:\Windows\System32\ .
Make sure to overwrite any existing files (but make a backup copy of the original file).
Reboot your computer.
Step 3
If the problem still occurs, try the following to register the DLL-file:
For 32bit DLL-files on a 32bit Windows, and for 64bit DLL-files on a 64bit Windows:
Open an elevated command prompt.
To do this, click Start, click All Programs, click Accessories, right-click "Command Prompt", and then click Run as administrator.
In Windows 8/10, go to the Start screen. Start typing cmd and Windows will find "Command Prompt". Right click "Command Prompt" and choose "Run as administrator".
If you are prompted for an administrator password or for a confirmation, type the password, or click Allow.
Type regsvr32 "filename".dll and press Enter.
Registering 32bit DLL-files on a 64bit Windows:
Open an elevated command prompt, as instructed above.
In the command prompt, start by typing following and press enter:
cd c:\windows\syswow64\
then type the following and press enter:
regsvr32 c:\windows\syswow64\"filename".dll
Finally, reboot your PC one last time to refresh the memory. That should do it!
IF YOU HAVE ANY TROUBLE GETTING THIS TO WORK HERE ARE SOME ADDITIONAL RESOURCES:
· if anyone has Check our forum had similar trouble.
· If you are unsure where to place the file, systemexplorer.net usually has good intel on common locations on users' computers.
· If the problem you are facing is related to a specific program, and you know which one, get in touch with the original developer and try to get a fix from them.
· If the problem is related to an unknown program and/or significantly interferes with usage of your computer, there are only two options left:
1. Do a system restore to restore to an eariler problem-free period, find out how to do it here.
2. Last option, if all else fails, this is a real pain, I know, but a full Windows reinstall/reset may be necessary
Thứ Tư, 6 tháng 2, 2019
Advanced Vision Course from The university of Edinburgh
Link: https://www.learn.ed.ac.uk/webapps/blackboard/content/listContent.jsp?course_id=_54479_1&content_id=_2584712_1
Advanced Vision Course Materials
The goal of this course is provide you with the skills to understand and sketch out solutions to a variety of computer vision applications. You should end up with the skills to tackle novel situations and incompletely defined applications. We will approach this by looking at 6 simplified computer vision systems that cover a large portion of the range of both applied and research computer vision.IMPORTANT INFORMATION: This course is not taught by the traditional lectures. Instead, AV uses an Inverted Classroom method. This means that you will have about 15 hours of video to watch in your own time. This material is assessible. There are still 2 full class meetings each week. Normally, at the first meeting we will be discussing any questions that you either suggest in advance or raise in class on the day. The second meeting will be a guest lecture teaching you some advanced vision technology and applications (these talks are not assessed).Syllabus
This module looks at several approaches to building vision systems. The order of the topics might change depending on the practicals. See links to the systems in the left side navigation panel.- System 1: Orthographically viewed non-rigid 2D objects
- System 2: Recognising classes of shape
- System 3: Video Tracking (2D)
- System 4: 3D objects from range data (recognition)
- System 5: Video based human behaviour understanding
- System 6: 3D objects from stereo vision (recognition)
- System 7: Deep nets for Vision
In the process of doing this, we will encounter a variety of topics in low, middle and high level computer visionOther References, Course Notes and Other Study Materials
There is no perfect text book for this course.- Recommended course textbooks (All available electronically from the University library)
- E.R. Davies - Machine Vision - Theory, Algorithms and Practice, Elsevier, 5th Edition, 2005. (content for about 1/2 of course)
- Solomon & Breckon, "Fundamentals of Digital Image Processing - A Practical Approach with Examples in Matlab", "Support Web Site", Wiley-Blackwell, 2010, ISBN: 978-0470844731. (content for about 1/2 of course)
- R. Szeliski, "Computer Vision", Springer, 2011, ISBN: 978-1-84882-934-3. (content for about 1/2 of course)
- Optional supplementary textbooks
- T. Morris - "Computer Vision and Image Processing" (Palgrave, 1st Edition, 2004)
- D. A. Forsyth & J. Ponce - "Computer Vision - a modern approach" (Prentice Hall, 2nd Edition, 2012)
- Online computer vision resources at University of Edinburgh (and beyond)
- An index to online notes on some topics covered in the lectures.
- Online computer vision books.
- The HIPR image processing summary and on-line interactive demonstration package. Direct access is via HIPR2
- CVonline - an online encyclopedia of computer vision. (About 1200 of the 1600 topics have entries so far.)
- Illustrated Dictionary of Computer Vision (UoE internal access only, not wireless)
- Online documentation for the matlab image processing toolkit.
- Recent academic and industrial research in computer vision/graphics:
- ACM SIGGRAPH (graphics)
- Eurographics Digital Library (graphics)
- USC Bibliography (computer vision)
Online computer vision and image processing courses- Online computer vision lectures from the University of Central Florida.
- Robotic Vision - 50 hour MOOC from Queensland University of Technology
- Robotics: Perception - MOOC from University of Pennsylvania
Online MATLAB introductions and tutorials- MathWorks - Learn with MATLAB and Simulink Tutorials
- MATLAB Courses
- Learn to Code with MATLAB
- MATLAB Tutorial
- Introduction to MATLAB | MIT OpenCourseWare
MATLAB code for the systems demonstrated in the lectures.Summary of In-class Activities
There is a summary of the questions that students emailed to me before class meetings and a summary of the in-class discussion exercises.Inverted Classroom Advice
Introduction: The expectation is that you take more control of your education in this course. There are no lectures in the traditional sense. Instead, we have pre-recorded 50-60 short videos (typically 15 minutes each) on different topics. You are to watch the videos in your own time (about 2 hours/week).There are six main topics and the videos for each topic are intended to be watched in the order listed on the Learn page. However, the topics themselves can largely be watched in any order. There are cross references from one topic to others.Using the materials: Each topic has a set of subtopics in a suggested order. You can get to the topic by clicking on one of the "View details" links. On the page for each of the topics, there are links to the subtopics. You can expose these by clicking on the topic name. Each subtopic has potentially 4 resources:- PDF: There are 3 PDF files. The first file is a full size set of the slides that are used in the video. The second file is a 4 slide to a page version. The third set generally has an unfilled box on each content slide. The idea is that you fill in the box while listening to the video; writing helps you remember the concept. The 4-to-a-page format is to save paper if you decide to print the file.
- Review question + answer: A question based on the material presented in this subtopic that helps you better understand the material. A brief answer to the question is given
- Video: A video explaining the content. It should be playable inline by clicking on the video, or the video can be downloaded in 3 different formats.
- References/Examples/Online: Other resources that will help you understand the topic, and also additional topics.
Timing: The topics are given a planned order and the main course web page has suggested a set of subtopics to be covered each week. You are expected to have watched the videos for that week before the start of the week. The class sessions are used: a) to answer questions that you email to me or ask in class and b) do some non-assessed group discussion on a vision problem related to the week's videos.The order and timing of the topics is chosen so that you will have covered the materials needed for the practicals in time.
Đăng ký:
Nhận xét (Atom)


